Thursday, November 22, 2018

Luminar Black Friday Offer: Now Live

The Luminar Black Friday Offer: Now Live!

Conveniently browse, rate, group your photos and much more…

  • Automatically group your photos by year, month & even day. Easily navigate between images and make sure that the perfect image you’re looking for is always at hand.

  • Give all your photos the look you want in seconds. Make the necessary edits on a single image. And instantly sync all the adjustments with a click.

  • With Luminar Libraries your photos will be the center of attention. A beautiful Interface offers a sleek canvas to enjoy all your images without extra distractions.
Luminar from Skylum brings professional editing tools without the complexity off some other well-known tools.

Now is the time to take advantage of some excellent Black Friday offers for both Luminar and Aurora HDR.

Also, by using the special links in this post and my affiliate code you can get an even better deal on the Luminar Black Friday Offer! To get the deal use this link here and use the special code NEWBELTANE.

Offer availability:

The Luminar 2018 Black Friday Offer will be available from November 21st through 28th.

Pricing:
● New users can purchase Luminar 2018 for US$59 (US$49 with my coupon code).● Current users of Luminar 2017 can upgrade for US$49 (US$39 with my coupon code).

*A special Black Friday Creative Collection of bonuses will also be included with every purchase.

In addition to Pre-Sale Bonuses there are Exclusive Black Friday Bonuses:● 1 year of FREE SmugMug Portfolio plan (US$180)● 119 Dramatic & Romantic Sky Overlays (US$29)● 20% OFF COOPH Photography Apparel and accessories (on all purchases over EUR100)

*Those who purchase Luminar from November 1 through 28 will get these bonuses for free. 
Pre-Sale Offer Bonuses:● ViewBug: 3-month Pro membership (US$42)● KelbyOne: 2-month Pro membership (US$40)● Rocky Nook: Choice of ANY e-book (US$40)● Daniel Kordan: Awesome Landscapes Tutorial (US$29)● Manfrotto & Gitzo: $20 gift card on any $120 purchase (US$20)


Tuesday, November 20, 2018

Photolemur Black Friday offer


Get ready for the Photolemur Black Friday Offer!

Here are the details:

Photolemur Family license + 3 Styles + Picaboo Book
  • $141 total worth - $25 only during Black Friday | 83% OFF
  • Photolemur Family license - 55$ worse
  • 3 Styles - 12$ worth each
  • Picaboo Book - 50$ worth
  • 141$ worth for 25$
To benefit from the offer use this link: Photolemur Black Friday Offer
Note: The offer runs from Wednesday, November 21 through Wednesday, November 28.

Wednesday, September 05, 2018

Mirrorless - the future of photography?

Mirrorless cameras offer certain advantages over the traditional DSLR format of camera. The one that attracts most photographers is the lower weight of the gear. If you have ever had to carry even one DSLR body, a couple of lenses and a tripod all day you will know that carrying all that weight around can be quite a burden (literally). Mirrorless systems are lighter and mean that overall you will have to carry around less bulk and weight yet still have a quality system with which take images.

Just recently, Nikon announced their full-frame mirrorless system, the Z Series. Currently they offer the Z6 and Z7 camera bodies.


As you can see, the Z7 is the more pro-version than the Z6, having 45.7MP resolution compared to 24.5MPs. It also has more focus points though it has less FPS than the Z6.

Along with the Z7 and Z6 bodies and mount adapter, Nikon has released details of it's new Z-Series lenses.


The Z7 body only costs around £3,399 and the Z6 body only costs £2,099 inc. VAT in UK. For more details on the Z Series cameras, mount adapter and lenses visit www.nikon.com

Well, Canon, it seems, don't want to be left out and have now announced their own full-frame mirrorless system, the Canon EOS-R system.


Like the Nikon, the Canon system introduces a new mount. This means that owners of existing lenses (many of them costing several hundred if not thousands of pounds - a not insignificant investment) will need to buy a mount adapter (as with the Nikon) if they wish to use their existing lenses. The EOS R System adapters offer full compatibility with Canon EF and EF-S lens range, giving EOS R owners who also own an EOS camera complete integration with their existing lenses

Of course, Canon have also announced some new R-Series lenses to go with their shiny, new and expensive camera.

For more information on Canon's new EROS-R range visit www.canon.co.uk


Both Nikon and Canon (along with Sony and FujiFilm) have made grand claims for their systems. Nikon says 'Mirrorless reinvented.... a system only Nikon could create' whilst Canon says of their system 'a system designed for the future, today..... it redefines the boundaries of photography and filmmaking.' Grand claims indeed.

Whether you agree with these claims or not, one thing is certain... mirrorless camera systems are here to stay. Whether they sound the death knell of traditional DSLR systems remains to be seen. Personally, I can't envisage a future where both types of digital cameras can co-exist, if only because of cost. It takes huge investment to design and manufacture digital cameras, as well as market and distribute them. Also, with the continued improvement in the quality of smartphone cameras and the potential of cameras such as the 'Light' - see https://light.co/camera, the market for expensive and relatively heavy DSLR cameras will continue to diminish.

Between 2012 and 2017 the total number of interchangeable lens cameras sold was almost halved from 2012 to 2017. Figures from CIPA.There is no coming back from this fact and although DSLR cameras outsell mirrorless for now, the trend means that by 2019 it will be mirrorless that overtakes DSLRs.

So, in answer to my opening question 'Mirrorless - the future of photography?' I would say that for the foreseeable future, the answer is a very definite yes!

Wednesday, August 29, 2018

Photolemur 3.0 announced! Pre-order now.

ce


Photolemur 3.0 is now available for pre-order!


Photolemur is a photo editor with a difference - you can enhance your photos on autopilot! The latest version has been announced and is available now for pre-order. Here are the most essential changes in Photolemur 3.0: Automatic Face Enhancement with skin retouching and teeth whitening

  • Adding Styles to photos New menu for opacity settings 
  • Quick access menu for face enhancement, lens correction and eye enlargement 
  • Apply settings from one image to all images in batch 
  • SmugMug Export (for Mac version) 

Performance and stability boost Offer Availability:

Photolemur 3.0 is available for pre-order now, and released on September 14.

Pre-Order Pricing:


  • New users can purchase Photolemur 3.0 Family at a special pre-order price of $49 
  • A collection of bonuses will also be included in every purchase. 

Photolemur 3.0 Regular Pricing:


  • Current users may upgrade at a price of $19 
  • New users can purchase Photolemur 3.0 Family at a price of $59 
  • New users can purchase Photolemur 3.0 Single at a price of $39

Here are my initial thoughts having tried out the software (as an affiliate I get early access but all my posts are independent and I blog my actual findings and impressions without prejudice).

Once you load up the software you will see this initial screen:


You can drag an image over the dialogue window and Photolemur will get to work straight away. Alternatively, you can use the 'OPEN' button to locate your image and then load it into Photolemur 3.0.

Once the image is loaded into Photolemur 3.0, the magic starts to happen as the software analyses and processes your image. Now, I dropped a Fuji RAW file that was 50.6 MB in size and it took less than 60 seconds to finish processing my image. Pretty impressive when you consider it's not just opening the image but also analysing the image and making adjustments on the fly. Here is a screenshot of what you see whilst the software does it's magic:


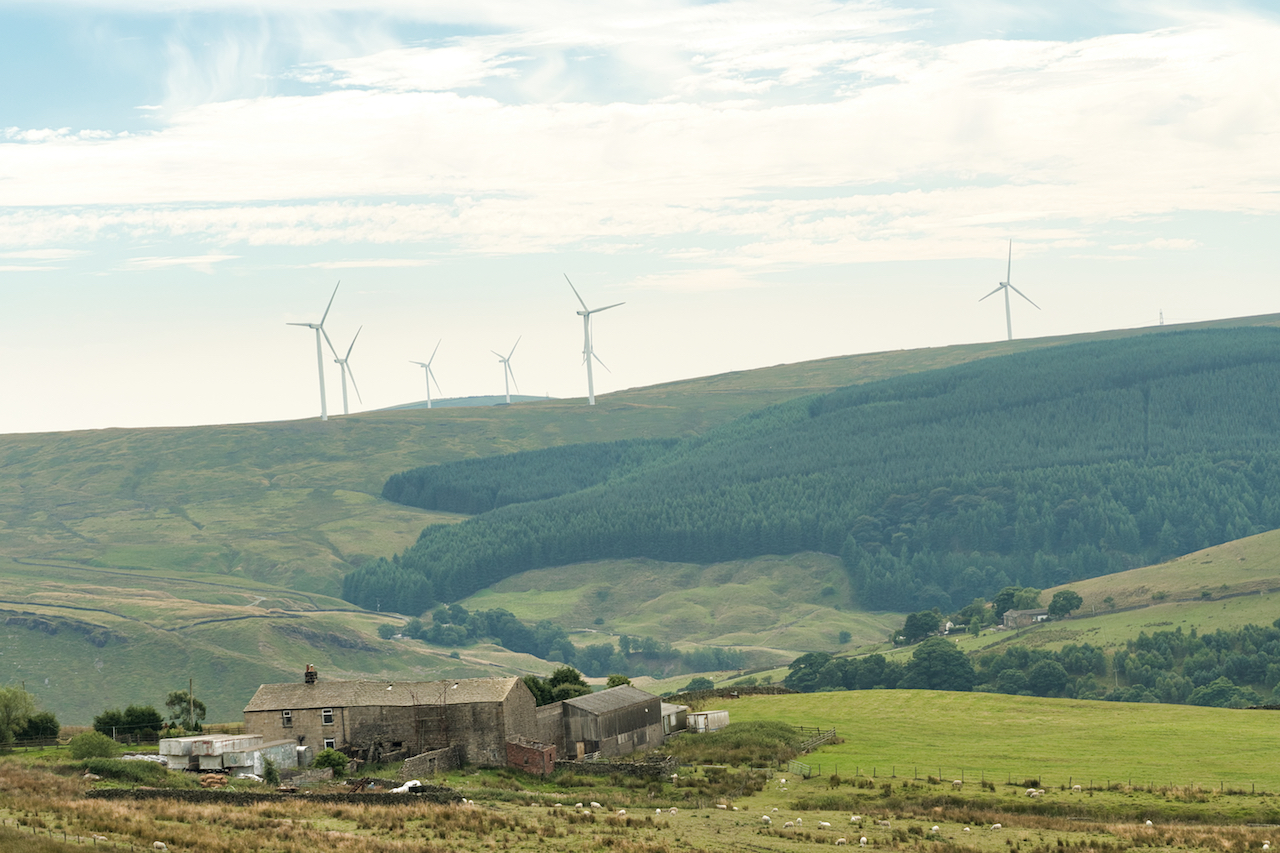
As I said, it took less than a minute to process my Fuji RAW file, all 50.6 MB of it. Once it has finished processing your image, this is what you will see:


As you can see, you are presented with a split screen, showing the 'before' and 'after' states of your image. You can drag the vertical bar left and right for a quick comparison of the two. Alternatively you can click the brush icon and then you are presented with a different view:


Now, instead of the vertical slider you have a preview of the processed image in all it's glory with a slider underneath. You can use this slider to tweak how much processing you wish to keep in your final image, from 0 - 100%.

New in Photolemur 3.0 are two options to the left of the slider. The first is 'Face Enhancement' which can either be on or off. By default it seems to be off and as this image contained no faces I didn't test it's effect this time. I will try it out on some faces in another post.


The other option is 'Automatic Lens Correction':


Once you have settled on how much of Photolemur's processing you wish to keep it's time to export your image. As with earlier versions of Photolemur, you have various options apart from simply exporting as a file to disk.


You can export to your Flickr, Facebook, Twitter and SmugMug accounts. For exporting to disk there are various options available to you including several advanced settings for automatically adding text to your filenames etc. You can also save these as presets for reuse later. You access these by clicking on the advanced options button after choosing the export to disk option:


If you simply wish to export your image to your disk you can choose to do so at maximum quality or choose a reduced quality setting using the slider. Here, for example it's set at Jpeg 85%. There are also other choices including png etc.

However, if you want to automatically rename the saved file (say by adding a prefix or suffix to the filename) then you can easily do so by choosing the 'Advanced Settings' option. Doing so will present you with various options:


You can choose a wide variety of options and save them as a preset for later reuse without having to spend valuable time choosing the same options over and over. For instance you can choose a default folder location to save your images, add text to the start of an image's filename, set the default quality and file type (say Jpeg 100% rather than the default 85%) and change the colour profile of your image depending on whether its intended for the screen (web) or printing. 

You can also create presets for resizing your image and there are various options available such as resize to a set pixel dimension on the long side. This is a great time-saving option and Skylum is to be applauded for including this facility in the software. It will save time opening up a second program just to save smaller versions of your images, say for blog posts etc.

Here a screenshot of an example preset:


As you can see, in this example, I have added Photolemur_3.0_ to the start of the image's filename. You can also that under the Resize option you can choose either the original dimensions, or resize by the long edge, short edge or custom dimensions.

You can then save your choices as a preset to go with the two default ones of Web Jpeg or Email.


So, finally, exporting my image at full resolution took just over 1 minute (1:01.73 to be precise). Not bad for an image that ended up being just under 30MB in size!

So, should you get Photolemur 3.0 or upgrade from an earlier version? In my view you should definitely upgrade. It's certainly worth the $19 price to upgrade and version 3.0 certainly feels quicker (see my earlier blog post here for my review of the previous version). The Face Enhancement feature and Auto Lens Correction features certainly make it a worthy upgrade. I have yet to try out the Eye Enlargement feature so look forward to a future post on this and the Face Enhancement feature soon.

For anyone else looking for a photo editor that will make their lives easier and avoid expensive options such as Photoshop and Lightroom, along with all the hassle of getting to know all the complex options in the those programs, Photolemur 3.0 is the best option on the market. Why not let it's A.I. do the hard work for you whilst you get on with editing your images? Life is too short for making things more complicated than they need to be!

So, why not head over to Skylum's site and get your pre-order in to benefit from the offer price options right now?


Friday, August 10, 2018

Photolemur uses AI to auto-enhance your images instantly (almost!). With Discount Code!

Skylum is known for its excellent stable of award-winning photo-editing software such as Luminar 2018 and Aurora HDR. Recently, Photolemur has joined the team and you can now enjoy enhancing your images easily using AI allowing those of us who are not professionals or who lack the knowledge and skills to use curves and layers etc to still get excellent results.

To give you an idea of what's possible I have put together a little example of an edit of a photo I took on a recent trip to the north-west of England. It was a very sunny day so the conditions were very bright and contrasty, meaning that some of the highlights were somewhat burnt out, as you can see in the sky in the first image below.

The image was taken on my Fuji X-T2 in RAW and opened in Apple Preview on my Mac. No editing was done and it was saved as a JPEG. As you can see, the clouds are burnt out, the image lacks overall contrast and appears a little flat.

Here is the image being opened in Photolemur. I have included a short series of images to illustrate the process but as it is all virtually automated once you choose your image it happens pretty quick. With a capable computer (powerful cpu, graphics card and lots of RAM) it only takes seconds to process a RAW file of 50MBs - impressive!


So, whilst Photolemur is doing it's magic it displays a pretty animation and some helpful information about what the AI is up to.


More magic at work.....


Once the magic is done it displays the processed image with a slider to show the 'before' and 'after' image. At the bottom right is a brush icon (more on that in a second) and an 'export' button. If you are happy with the result, you can just click the export button and Photolemur will apply the full effect to your image and export the result, either to file or to a service such as Facebook, Twitter or Flickr (see below).


However, if you would like to tone down the impact of Photolemur's processing then by clicking the brush icon you then get a slider that allows you to choose a setting between the original and Photolemur's effect, which it calls 'boost' (see above). Once happy with your choice, you can then hit that export button.


As well as exporting the final image to file you can export to Flickr, email. Facebook, Twitter and Snapheal.


If you choose to export to disk (as a file) then you get the usual options of where to save the file and adding tags (on the Mac) but yo also get an advanced settings option (see below). You can, of course, save your file as a JPEG, PNG etc.


The Advanced Settings option allows you to automatically add prefix/suffix etc to filenames, change colour profile, resize image etc and create presets.


Once you are done exporting you can import another image and continue working on your masterpieces.

Now, for final result of my image.


As you can see, Photolemur has recovered some of the details in the highlights, helped no doubt by the fact the original was shot in RAW. However, I think the image still lacks a bit of punch and so I tweaked it slightly in Apple's Preview using the auto function.


Personally, I prefer this version as it has a bit much contrast and better blacks. However, overall, I think Photolemur did and excellent job and it handled a very lack RAW file well, processed it quickly in under a minute on a 4 year-old MacBook Pro (Retina, 13-inch, Mid 2014) and didn't require any great technical knowledge or skills with the likes of Photoshop, Lightroom or other expensive photo editing software.

If you are looking for an inexpensive photo editor that doesn't require great heaps of technical knowledge or huge amounts of time to learn then you should seriously consider Photolemur. Visit here and use this code STEVENDALE to get 30% off for a limited time only.

Monday, February 26, 2018

OFFER EXPIRES SOON! Get Skylum 2018 at a discount (and claim extra discount with code).


Skylum's offer on Luminar 2018 expires soon (The offer expires at 11 a.m GMT, February 27th) so you need to hurry to get it at a special price.

Use this link: Luminar 2018 Deal and use the discount code NEWBELTANE to get even more off.


You can also get Skylum's Aurora HDR 2018 at a special price by using the following link:
Aurora HDR 2018 Deal and you can use the discount code NEWBELTANE to get even more off Aurora HDR 2018 too!


I have recently been using Luminar 2018 to edit some RAW images taken on my Fuji X-T2. I went with a friend to Essex Wildlife Trust’s Nature Reserve with the intention of taking some wildlife images. We arrived at the hides to find the wind was almost gale force and it was a very cold day. The combination of wind and temperature had persuaded the wildlife to stay somewhere more sheltered. So, we retreated to the visitor centre for a hot drink and some home-made cake in an effort to warm up.

I did take some images of the hide and the reservoir before heading for shelter. We also managed to get some images of small birds using the feeders by the visitor's centre before we went inside.


The RAW DEVELOP mode of Luminar 2018 helps to get the best out of your RAW images before exporting as Jpegs or PNGs. At the top of this post you can see a screenshot of an image opened in Luminar 2018 and some RAW presets loaded at the bottom of the workspace. Here are some further screenshots:


The screenshot above is without any changes made to the image. I merely opened it in Luminar but without any of the presets or other filters applied.


In this screenshot you can see I have applied a preset (Clear and Cold) to the image. The preset has given the image a cooler appearance.


In this screenshot you can the result of applying the Clarity and Contrast preset. Presets make it easy to add various filters all at once and you can download this set of RAW Develop Presets from here: Raw Develop Presets. BTW the presets are free.

I will be posting a walkthrough in the near future of editing an image from start to finish so be sure to bookmark my blog and don't forget to catch the special deal and extra bonus (using the links can discount code above).

Tuesday, February 20, 2018

Is it possible to take photos in almost pitch dark? Don't forget to get Luminar 2018 at special price!


One of benefits of digital photography is that the technology behind it is always moving forward. Much faster than the technology behind film emulsions ever was. In the area of sensors this is particularly true and it means that as image makers (both of photographs and video) we get tools that are more and more powerful with each passing year. Not that it's all about the technology (at least not yet buy Artificial Intelligence will be a real game-changer; we just don't precisely how) - you still need some skills to create great images.

However, improvements in sensor technology over the years have brought us the ability to create images in really very low-light. In fact, in what appears to us as almost total darkness, the best of digital cameras can capture enough light to reveal details that we didn't see at the time.

Cameras as a whole have seen great strides in this area but some more than others. The Sony A7 series has earned itself many a plaudit for it's low light performance. Other brands are also pushing the boundaries ever further. My own experience is that what is now possible is something that just a few years ago seemed impossible. It wasn't that long ago that you wouldn't want to shoot anything that required an ISO of greater than 800. Now its expected that digital cameras should exhibit little if any noise at ISO 1600.

If you look at some of the pro cameras from each of the main brands and examine their recommended ISO ranges you will find the following:
  • Canon EOS 6D Mark II: ISO 100-40,000 (expandable to 102,400);
  • Nikon D850: ISO 64-25600 (expands to 32-102400);
  • Sony a7R Mark III: ISO 100-32000 (expands to 50-102400);
  • Olympus OM-D E-M1: ISO 200-25600 (expands down to 64);
  • Panasonic GH5S: ISO 160 - 51,200 (80 - 204,800 extended);
  • Fuji X-H1: ISO 200-12800 (expands to 100-51200);
  • Pentax K-1: ISO 100-204800.
This shows that cameras today are much more capable than their predecessors when it comes to low light images. The upper limits of these figures mean that what appears as virtually pitch dark to the naked eye can still be captured, albeit it with a very high ISO setting and the presence of image noise.

The real question is how usable are these settings and is the image noise something we can manage sufficiently so that it doesn't degrade the final image significantly? Well, I am not fortunate enough to have access to any of these cameras to field test them but there are many sites online that you can read in-depth reviews on each of them, including tests of their low light performance and how they deal with image noise.

I do, however, own a Fujifilm X-T2 and so it was that I decided to try some low-light photography. Normally, the only low light photography is get close to is after the sun has set but whilst there is still some light in the sky. This would be the first time I had tried taking images well after sunset in the dark.

A friend of mine has just purchased a Canon D750 so we agreed to meet up and decided that he lives in Ipswich and I live in Colchester, that we would try and get some images of Felixstowe Container Port and Harwich International Port at night. Checking Google maps we choose Shotley Marina as a good starting place. Thought it was overcast and raining we didn't really mind as we wanted to get shots of the lights reflected in the water. We hoped that we would manage to get some shots of a container ship and a ferry.

On arrival we decided that we would eat first and so had a meal at the Shipwreck Pub, Bar & Restaurant, located at the marina. I can heartily recommend the service the ambience and the quality of the food if you ever find yourself there.

Once we had set up our cameras on their tripods we started taking images. I was using my Fuji X-T2 with FUJINON LENS XF50-140mm F2.8 R LM OIS WR and the FUJINON TELECONVERTER XF1.4X TC WR.

Here is an image without any editing other than exporting from Luminar 2018 as a jpeg (I shot in RAW).


As you can see there are some issues with the image. Both colour and luminance noise is visible in both the shadows and the sky, the horizon is not quite level and the highlights are somewhat blown.

I then played around with the original RAW file in Luminar 2018. Here are some screenshots:

RAW Develop and DeNoise in Luminar 2018

Levelling and cropping in Luminar 2018

After DeNoise applied

Before DeNoise applied in Luminar 2018

Sharpening applied in Luminar 2018

Before sharpening applied in Luminar 2018
Here is the resulting image:


I am not saying this is a great image, though I do like it and feel it is a nice image, especially considering that the actual scene was very dark to the naked eye, due in no part to how our eyes and brain work together when looking at this type of image.

However, when you consider that I shot at ISO 12,800 I think you will agree that on the whole the noise is reigned in sufficiently for it to be a perfe to ectly usable image. I would love to print this out at A3 but sadly, I don't have a printer capable of producing quality prints at that size.

Finally, there is still time to get Luminar 2018 (and Aurora HDR 2018) t a special price with an extra discount using the code NEWBELTANE. You need to use these links: Luminar 2018 special offer! and Aurora HDR 2018 special offer!

REMEMBER: Use the discount code NEWBELTANE to get an extra discount off!


Sunday, February 18, 2018

A dog is for life. Memories of a beloved rescue greyhound, Petal.


I was browsing images on my phone and came across this one of Petal, our recently deceased rescue greyhound. We had her for over 9 years from when she was aged 4. She was a rescue greyhound, which for those who don't know what this is, I will briefly explain. In the UK and Ireland it was once very popular to go to the dog races and bet on greyhounds racing around a track after a 'rabbit' (not an actual one, just one to get the dogs hunting instincts going).

However, over the last few decades, the popularity of greyhound racing has declined to the point that there an awful lot of retired greyhounds. Most were finished as racing dogs after 4 years or so and many were then euthanised. It is difficult to know for sure what happens to every greyhound that is retired or not fit for racing any more. Thousands are rehomed by charities (which is where we got Petal) but the League Against Cruel Sports estimates that around a thousand 'disappear' every year. Some are sold to research labs but it's thought many are simply euthanised despite being perfectly healthy.

Greyhounds make great pets, have wonderful personalities and are very affectionate! We have lots of happy memories of our beloved greyhound Petal and miss her greatly. Sadly, she developed a chronic condition that required every increasing doses of pain-killers. In the end it wasn't fair on her to put her through any more pain and discomfort. She was euthanised at home with her family beside her and although it was terribly sad to say goodbye, we know we did the best for her.

As I said, we have lots of happy memories of her time with us and the photo above is of her on the beach at Mersea Island. She loved the beach and exploring nooks and crannies, as well as running into the surf! It was a pretty cold day so she had her fleece on to help keep her warm.

If you want to know more about rescue greyhounds and lurchers visit the Forever Hounds Trust website here, the Greyhound Trust website here or, if you live in Essex, the Clarks Farm Greyhound Rescue website here. This is where we obtained Petal.

Friday, February 16, 2018

How to get Luminar 2018 for a special price and get your DISCOUNT CODE for even more off!.


Skylum (formerly Macphun) have not only released an update of their Aurora HDR 2018 (and on offer too, until 26th Feb), but they have similarly released updates to their Luminar 2018 software (again with bug fixes and updates).

Until the 26th Feb you can get the software at a special price. Here are the details:

Pricing:
  • Current users of Luminar may upgrade for $49 ($39 with your coupon code)
  • New users can purchase Luminar 2018 for $69 ($59 with your coupon code)
  • A collection of bonuses will also be included with every purchase.
Bonuses:
  • 2 E-books from Andrew Gibson: "The Creative Photographer" and "Mastering Exposure"
  • Ultra Violet LUTs by Richard Harrington
  • Ultra Violet Preset Pack by Richard Harrington
  • Futuristic Preset Pack
You can also get an extra discount using my code 'NEWBELTANE' to get the extra discount. Use this link here to get the special price and then enter the discount code at checkout. 

BTW: You can use the same discount code (NEWBELTANE) if buying Aurora HDR 2018 too!


Featured Post

DDR5 Memory: Unveiling the Next Generation of Memory Technology

Empowering Your System with Unprecedented Performance In the ever-evolving landscape of computer technology, the demand for faster, more eff...